French Dip Biscuits are the ultimate comfort food mashup, combining the savory, juice-dripping satisfaction of a classic French dip sandwich with the flaky, buttery layers of a fresh-baked biscuit. If you are looking for a handheld meal that feels like a gourmet treat, these golden-brown pockets of joy are the answer. Every bite delivers a perfect ratio of tender thin-sliced deli roast beef and gooey melted provolone cheese, all encased in a shiny, butter-glazed crust.
This recipe for French Dip Biscuits is designed for the busy home cook who refuses to compromise on flavor. By using high-quality biscuit dough and a signature savory au jus sauce, you can bring restaurant-quality sliders to your kitchen table in less than 30 minutes. Whether you are hosting a game day party or need a quick weeknight dinner, these biscuits are guaranteed to disappear in seconds.
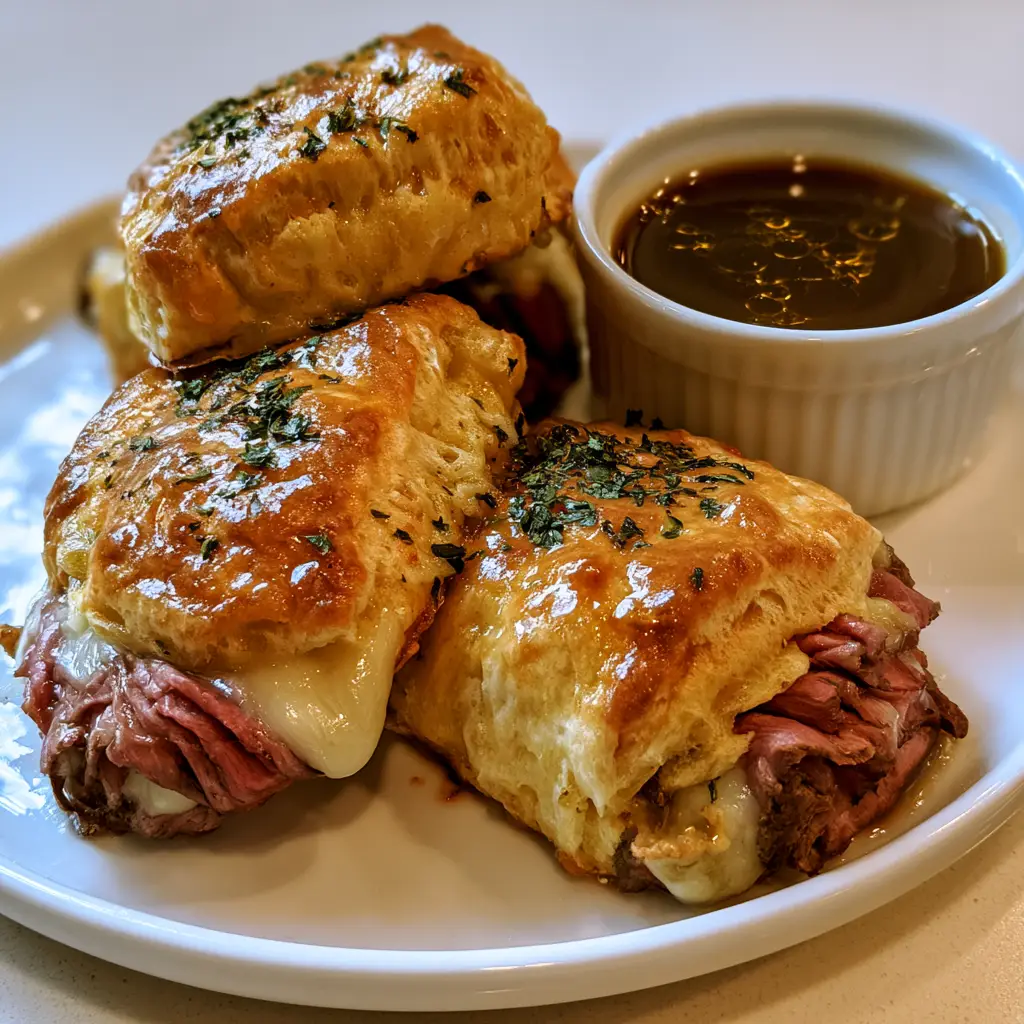
Why You Will Love These Savory Roast Beef Biscuits
- Unbelievable Texture: The contrast between the flaky, golden-brown baked biscuit dough and the warm, tender folds of beef is addictive.
- Ultra-Glossy Finish: A generous melted butter glaze topped with dried parsley flakes ensures every biscuit looks as good as it tastes.
- The Perfect Dip: The dark brown savory au jus sauce provides a salty, umami-rich finish that softens the biscuit just enough.
- Handheld Convenience: No messy sandwiches falling apart here; these are self-contained flavor bombs perfect for dipping.
Essential Ingredients for Success
To make the best French Dip Biscuits, you need to start with the right components. Each ingredient plays a specific role in creating that iconic “French Dip” experience.
The Dough and Filling
Refrigerated Biscuit Dough: Look for “Grands” or “Flaky Layers” style biscuits. The multiple layers are essential for creating pockets that hold the melted cheese. If you have extra time, you could even use the base from my butter swim biscuits for an even richer experience.
Thin-Sliced Deli Roast Beef: Choose a high-quality, rare-roasted beef from the deli counter. Thin slices allow you to fold the meat, creating more surface area for the melted provolone cheese to cling to.
Provolone Cheese: This is the classic choice for a French dip. It melts beautifully without becoming too oily, providing a mild, creamy balance to the salty beef.
The Flavor Enhancers
Salted Butter: We use melted butter to brush the tops of the biscuits before and after baking to achieve that “shiny buttery glaze” seen in the photos.
Dried Parsley Flakes: These add a pop of color and a subtle earthy note that cuts through the richness of the beef and butter.
Au Jus Mix or Beef Consommé: This forms the base of your dark brown savory au jus sauce. We want a deep, translucent liquid with tiny oil bubbles on the surface for that authentic look and feel.

How to Assemble the Ultimate French Dip Biscuits
Follow these steps carefully to ensure your French Dip Biscuits are perfectly sealed and beautifully browned.
Step 1: Prep the Dough
Preheat your oven to 375°F (190°C). Line a baking sheet with parchment paper. Separate each biscuit into two thinner rounds. This creates the perfect thickness for stuffing without the dough becoming too bulky or raw in the center.
Step 2: Stuff with Beef and Cheese
Take a slice of provolone cheese and fold it into a small square. Place it in the center of a biscuit half. Layer 2-3 thin folds of roast beef on top of the cheese. Placing the cheese on the bottom ensures it creates a “seal” against the bottom crust, preventing the beef juices from making the biscuit soggy.
Step 3: Seal and Glaze
Place the second biscuit half over the top. Use your fingers to pinch the edges tightly, rolling them slightly inward. This prevents the melted provolone cheese from escaping during the bake. Brush the tops generously with melted butter and sprinkle with dried parsley flakes.
Step 4: The Golden-Brown Bake
Slide the tray into the oven and bake for 12-15 minutes. You are looking for a specific visual cue: the tops should be a deep golden-brown and the edges should look crisp and flaky. While they bake, prepare your au jus sauce in a small saucepan until it is steaming and fragrant.
Expert Tips for the Best Results
- Don’t Overstuff: It is tempting to pile on the beef, but too much filling will cause the biscuits to burst open. Stick to 2-3 thin folds.
- Cold Dough is Key: Keep your biscuit dough in the fridge until the very moment you are ready to assemble. Cold fat equals flakier layers!
- The “Double Butter” Technique: Brush the biscuits with butter before they go in the oven for color, and again immediately after they come out for that signature shine.
- Beef Quality Matters: If your roast beef is very wet, pat it dry with a paper towel before stuffing to ensure the dough stays crisp.
Creative Variations to Try
While the classic French Dip Biscuits are perfection, you can easily customize this recipe. If you love bold flavors, try brushing the inside of the biscuit with a bit of my cowboy butter sauce for a garlic and herb kick.
For a “Philly” twist, add a few sautéed peppers and onions inside the biscuit alongside the beef. If you are looking for a more substantial meal, these biscuits pair beautifully with a side of dill pickle coleslaw to provide a bright, acidic crunch against the rich gravy.
How to Store and Reheat
Storage: Store any leftover French Dip Biscuits in an airtight container in the refrigerator for up to 3 days.
Reheating: To maintain the flaky texture, reheat them in the oven or air fryer at 350°F (175°C) for 5-7 minutes. Avoid the microwave, as it can make the biscuit dough chewy rather than crisp.
Freezing: These biscuits freeze surprisingly well! Wrap them individually in foil and store in a freezer bag for up to 2 months. Reheat directly from frozen in the oven at 375°F (190°C) for 15-20 minutes.
What to Serve With French Dip Biscuits
Since these are rich and savory, you want sides that offer contrast. A crisp green salad or roasted vegetables are excellent choices. If you want to keep the “comfort food” theme going, try serving them alongside a hearty kielbasa potato casserole for a feast that will satisfy even the hungriest crowd.
Frequently Asked Questions
You can assemble them a few hours early and keep them refrigerated, but for the flakiest results, bake them fresh just before serving.
Absolutely! Just ensure your dough is rolled thin enough to cook through while the meat and cheese heat up.
Make sure to pinch the edges of the biscuit rounds very firmly. You can also crimp them with a fork for an extra-secure, decorative seal.
A high-quality, thin-sliced deli roast beef (like London Broil or Top Round) works best because it folds easily inside the dough and stays tender.
Store-bought mixes can be high in sodium. You can balance the salt by adding a splash of water or a teaspoon of Worcestershire sauce for depth without more salt.
The Official French Dip Biscuits Recipe
French Dip Biscuits: Flaky, Buttery, and Stuffed with Roast Beef
Ingredients
Equipment
Method
- Preheat oven to 375°F (190°C). Separate each of the 8 biscuits into two thinner layers to create 16 rounds.
- Place a piece of provolone cheese and a fold of roast beef on 8 of the biscuit rounds. Top with the remaining 8 rounds and pinch edges tightly to seal.
- Place on a baking sheet. Brush with half of the melted butter and sprinkle with dried parsley flakes.
- Bake for 12-15 minutes until the biscuits are golden-brown and the cheese is melted.
- While biscuits bake, whisk au jus mix and water in a saucepan over medium heat until boiling. Simmer for 1-2 minutes.
- Brush the baked biscuits with the remaining melted butter for a shiny glaze. Serve warm with the au jus for dipping.
Notes
Ensure the edges are pinched very tightly so the cheese doesn't leak out during baking.

Join the Munch Community!
Did you make these French Dip Biscuits? I want to see how they turned out! These are a huge hit on Pinterest, so be sure to Save this recipe to your Dinner Board so you never lose it.
Scroll down to the comments and share a photo of your golden-brown biscuits and let me know how the au jus turned out! Don’t forget to leave a 5-star rating if you loved this recipe—it helps other home cooks find my kitchen! Follow @mia_munch for more easy, flaky, and delicious recipes every week.