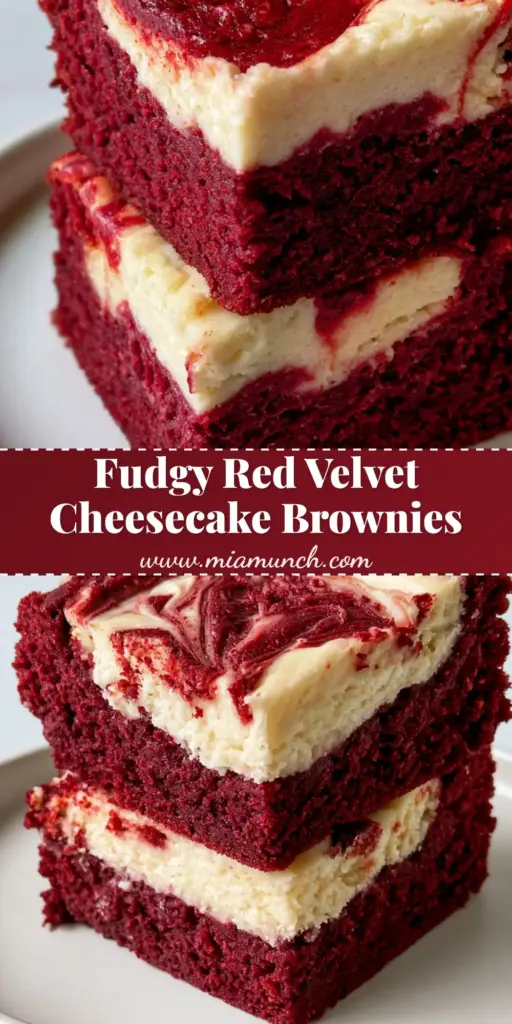
Red Velvet Cheesecake Brownies are the show-stopping dessert you’ve been searching for, combining a dense, fudgy cocoa base with a silky ivory-white cheesecake swirl. This isn’t just another brownie recipe; it is a masterclass in texture and color contrast that looks as incredible as it tastes. Whether you are prepping for a holiday party or simply craving a decadent treat, these bars deliver a sophisticated crimson hue and a tangy cream cheese finish that melts in your mouth.
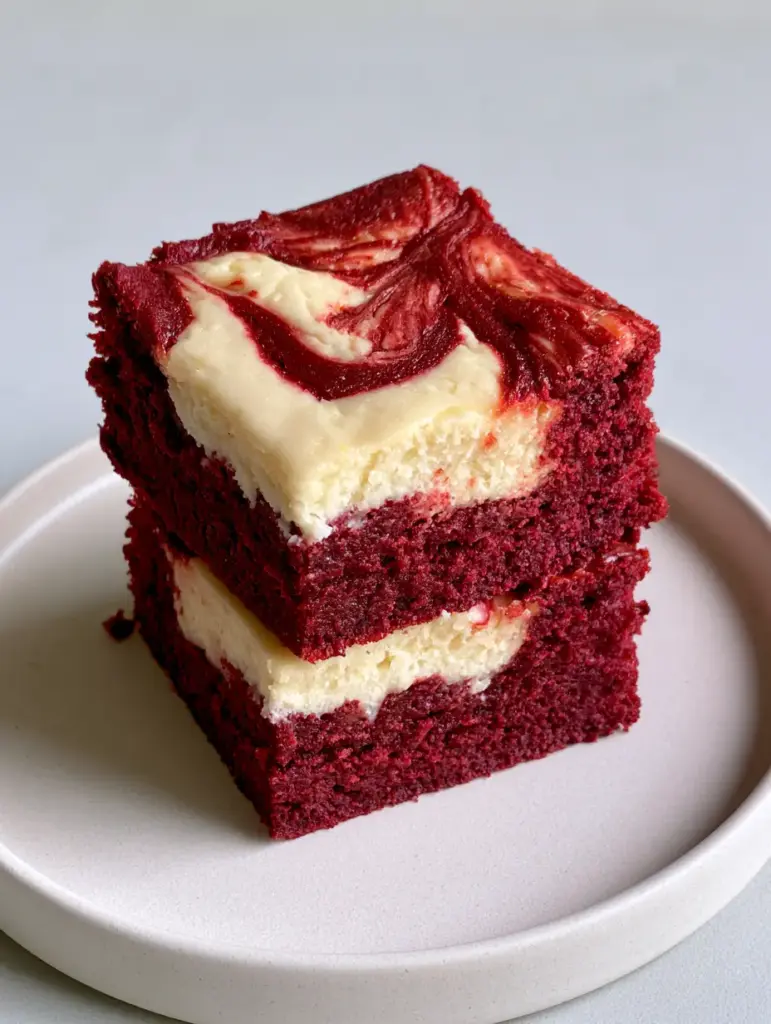
Why You Will Fall in Love With These Crimson Marble Bars
- The Perfect Crumb: Unlike cakey versions, these brownies feature a tight, moist, and fudgy crumb that mimics a rich chocolate truffle.
- Striking Visual Contrast: The deep crimson red velvet base provides a stunning backdrop for the creamy ivory-white cheesecake mixture marbled throughout.
- Expertly Balanced Flavors: The slight acidity of the cream cheese perfectly cuts through the sweetness of the cocoa-infused red batter.
- Clean, Sharp Edges: Designed to be cut into sharp, clean squares, these bars are the ultimate Pinterest-worthy aesthetic for your dessert table.
If you love the combination of chocolate and cream cheese, you might also enjoy my Peppermint Bark Brownies or these easy No-Bake Christmas Cheesecake Bites.
The Science of Fudgy Red Velvet Brownies
To achieve that thick, dense, fudgy red velvet chocolate brownie seen in our photos, we prioritize fat over flour. Using melted butter instead of creamed butter prevents excess air from entering the batter, ensuring a fudge-like consistency rather than a cake-like one. The addition of Dutch-processed cocoa powder provides a deep chocolate backbone without overpowering the classic red velvet flavor profile.
We use gel food coloring rather than liquid. Liquid coloring can alter the hydration levels of your batter, leading to a crumb that is too soft. Gel color provides that deep crimson color without compromising the structural integrity of the square-cut brownie bars.
Essential Ingredients for Success
The Fudgy Red Velvet Base
- Unsalted Butter: 3/4 cup (170g), melted and slightly cooled. This provides the richness and the “melt-away” texture.
- Granulated Sugar: 1 1/2 cups (300g) to sweeten and create those slightly crackly tops.
- Dutch-Processed Cocoa Powder: 1/4 cup (25g). This creates the cocoa-infused red batter depth.
- Red Food Coloring Gel: 1-2 teaspoons for that deep crimson color.
- Vanilla Extract: 1 tablespoon for aromatic warmth.
- Salt: 1/2 teaspoon to balance the sugars.
- Eggs: 2 large eggs at room temperature to bind the fudgy base.
- All-Purpose Flour: 1 cup (125g). Just enough to hold it all together without becoming bread-like.
The Creamy Cheesecake Swirl
- Full-Fat Cream Cheese: 8 oz (225g), softened to room temperature. This is vital for a creamy, ivory-white cheesecake mixture.
- Granulated Sugar: 1/4 cup (50g) to sweeten the tang.
- Egg Yolk: 1 large yolk, which adds richness and ensures the baked cream cheese topping stays velvety.
- Vanilla Extract: 1/2 teaspoon for flavor.
Step-by-Step Instructions for the Perfect Swirl
1. Preparing the Crimson Foundation
Preheat your oven to 350°F (175°C) and line an 8×8 inch (20x20cm) square baking pan with parchment paper, leaving an overhang on the sides. In a large mixing bowl, whisk together the melted butter and granulated sugar until well combined.
Stir in the cocoa powder, red food coloring gel, vanilla, and salt. The batter should be a vibrant, glossy dark red. Whisk in the eggs one at a time until the batter is smooth and shiny. Gently fold in the all-purpose flour just until no white streaks remain. Pro Tip: Reserve about 1/4 cup of this batter to use for the top marble pattern later.
2. Crafting the Creamy Cheesecake Layer
In a separate medium bowl, beat the softened cream cheese with the granulated sugar, egg yolk, and vanilla until completely smooth and lump-free. It should look like a thick, ivory-white cream. If your cream cheese is too cold, it will not swirl properly and you will end up with white dots instead of a beautiful marble.
3. The Marbling Technique
Spread the main red velvet brownie batter into the prepared pan, smoothing it into the corners. Drop dollops of the cheesecake mixture over the top. Then, take your reserved red batter and drop small spoonfuls over the white cheesecake areas.
Using a butter knife or a skewer, gently swirl the two batters together. Visual Cue: Do not over-swirl! You want to see distinct swirling patterns of red velvet batter and baked cheesecake. If you swirl too much, the colors will muddy into a pinkish blur.
4. Baking for Texture
Bake for 30-35 minutes. The edges should be set, but the center should still have a slight, gentle jiggle when you shake the pan. The top surface will show a beautiful baked cream cheese topping that is matte white against the deep red. Overbaking will destroy the fudgy crumb, so start checking at the 28-minute mark.
If you’re looking for other baked treats to fill your kitchen with amazing scents, try these Cinnamon Roll Muffins.
Expert Tips for Pinterest-Perfect Brownies
- Room Temperature Ingredients: Ensure your eggs and cream cheese are at room temperature. This ensures the creamy, ivory-white cheesecake mixture incorporates perfectly without lumps.
- Use a Metal Pan: Metal pans conduct heat more evenly than glass, which helps achieve those sharp, clean squares.
- The “Cold Cut” Method: To get the clean, sharp edges seen in our smartphone photo, you must let the brownies cool completely at room temperature and then chill them in the fridge for at least 2 hours before slicing.
- Wipe Your Knife: Between every single cut, wipe your knife clean with a damp cloth. This prevents the cheesecake layer from smearing into the fudgy red velvet brownie base.
Storage, Reheating & Freezing
How to Store
Because these contain a baked cream cheese topping, they must be stored in the refrigerator. Place them in an airtight container for up to 5 days. The texture actually becomes even more fudgy and dense after a night in the fridge!
Can I Freeze These?
Yes! These Red Velvet Cheesecake Brownies freeze beautifully. Wrap individual square-cut brownie bars tightly in plastic wrap and then place them in a freezer bag. They will stay fresh for up to 3 months. Thaw in the refrigerator overnight before serving.
What to Serve With This
These brownies are incredibly rich, so they pair best with something that offers a clean palate cleanse. A tall glass of cold milk is the classic choice. For a more sophisticated pairing, serve them alongside a tart raspberry coulis or a simple cup of dark roast coffee to balance the sweetness of the cocoa-infused red batter.
If you’re hosting a full dinner before dessert, consider a savory main like my French Onion Chicken Orzo Casserole or this Honey Pepper Chicken Mac and Cheese.
Frequently Asked Questions
You can, but liquid coloring is less concentrated and adds extra moisture. This can make the brownies more cake-like rather than fudgy. For the best texture, gel is highly recommended.
The secret is the ‘Cold Cut.’ Chill your brownies in the refrigerator for at least 2 hours. Use a sharp knife and wipe it clean with a damp cloth between every single slice.
No, because of the cream cheese content, these brownies must be stored in an airtight container in the refrigerator to keep them fresh and safe to eat.
This usually happens if you use too much cocoa powder or not enough food coloring. Using Dutch-processed cocoa powder helps maintain the deep crimson color, and always use gel coloring for the most vibrant results.
The Ultimate Red Velvet Cheesecake Brownies Recipe
Red Velvet Cheesecake Brownies: The Ultimate Fudgy Marble Bars
Ingredients
Equipment
Method
- Whisk melted butter and sugar. Add cocoa, red gel, vanilla, and salt.
- Whisk in eggs one at a time, then fold in flour. Reserve 1/4 cup batter.
- Beat softened cream cheese, sugar, yolk, and vanilla until smooth.
- Spread red batter in pan. Dollop cheesecake mixture and reserved red batter on top. Swirl with a knife.
- Bake at 350°F (175°C) for 30-35 minutes until edges are set but center jiggles slightly.
Notes
Use gel food coloring to maintain the fudgy texture without adding excess moisture.
Share the Love!
If you made these Red Velvet Cheesecake Brownies, I want to see your results! Did you get that perfect ivory-white marble? Tag me or save this recipe to your Pinterest Dessert Board so you never lose it. Please leave a 5-star rating in the comments below if you loved the fudgy texture. Happy baking!